Do you send multiple templated personalized emails to your leads on a daily basis when certain event happens? For example, when a lead expires their opt-in validity, you may be sending them lead expiration email asking them to register to your Funnel again. It would be manageable if you’d only do this once in a while for few leads. But what if you needed to do it on a daily basis for 10 or more leads? This task is repetitive and time-consuming when done manually.
To solve this pain point, we’ve developed an email tool that can send personalized emails in bulk. Not just personalized but also trackable. You just have to input the names and email addresses and click the Send button and the emails will be sent to the specified recipients. The sender will be your business email address. The email body is personalized with the recipient’s name and personal links. This is a big time-saving tool that will help you to focus more on your business and spend less time contacting your leads or subscribers.
Email Tool Diagram
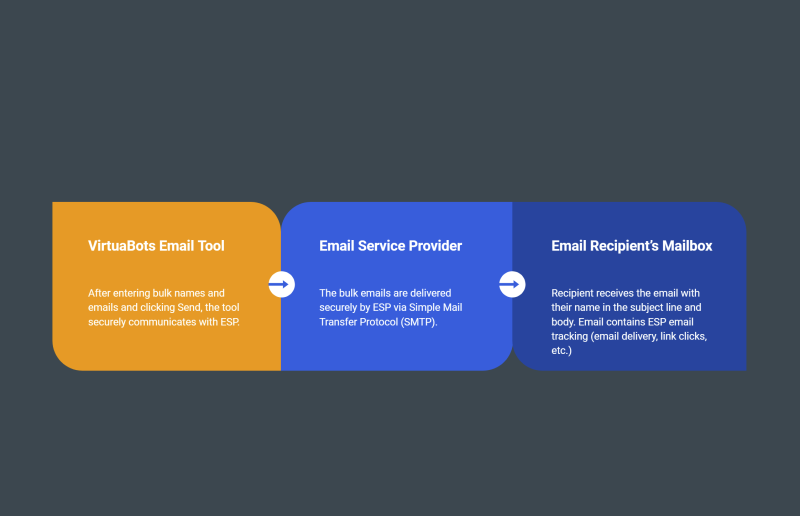
VirtuaBots Email Tool – After entering bulk names and emails and clicking Send, the tool securely communicates with ESP to send the email messages in bulk. The email contains personalized subject and body with recipient name. You can request us to use your own custom email content.
Email Service Provider – ESP receives the bulk emails from the Email Tool and then it delivers the messages securely via Simple Mail Transfer Protocol (SMTP) to the recipient’s mailbox.
Email Recipient’s Mailbox – Recipient receives the email with their name in the subject line and body. Email contains ESP email tracking (email delivery, email opens, link clicks, etc.)
Benefits of Using This Email Tool
- The email is personalized to the recipients. Personalized means both the email subject and body have the recipient’s name. This increases the probability that the recipient will open the email when they see their name in the subject. There could also be personalized links in the email body that contain recipient’s name and email address in the links. For example, if you use a personalized Webinar link that contain the lead’s name and email address, then this can also be included in the email. You may find other tools that can send personalized emails but it may not include personalized email subject. The subject is the first thing that the recipient sees so it’s critically important to catch their attention and curiosity by addressing them by name in the subject.
- You can send multiple emails in bulk at once. The emails will be sent separately for each recipient in a single click of a button. The recipient will see your business email address and name as the sender. When they hit Reply, it will show your business email address in the “To” field.
- The tool is using an Email Service Provider (ESP) to deliver the emails. Below are the benefits of using an ESP:
- Better email delivery and deliverability. The chance that the email will be delivered and accepted by the recipient’s email provider (delivery) and that the message will land in the recipient’s Inbox and not Spam folder (deliverability) is higher. Emails sent via ESP vs emails sent manually from your email client (Outlook, Gmail, Yahoo, etc.) have a higher chance of being delivered to the recipient’s Inbox.
- Email tracking. You can see the following statistics:
- How many emails were sent.
- How many emails were actually delivered to the recipient’s mailbox.
- How many emails were opened by recipients
- How many recipients clicked the links in the email.
- How many recipients unsubscribed.
- How many emails bounced or were undelivered.
- Which recipients actually opened the emails.
- Which recipients clicked links in the emails.
- When were the emails sent, delivered, opened and clicked or bounced.
- And many more!
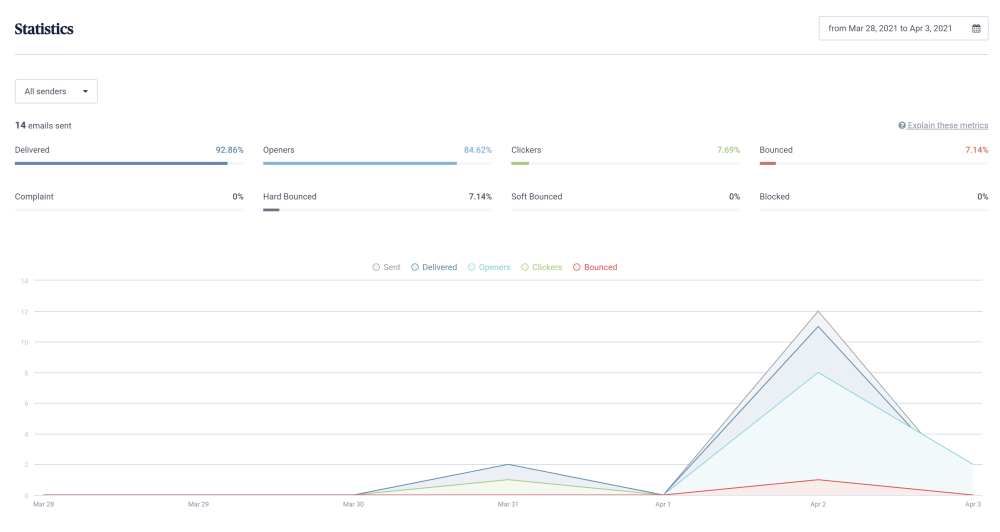
For Sendinblue ESP, here are the screenshots of the available statistics. Other ESPs have similar statistics.

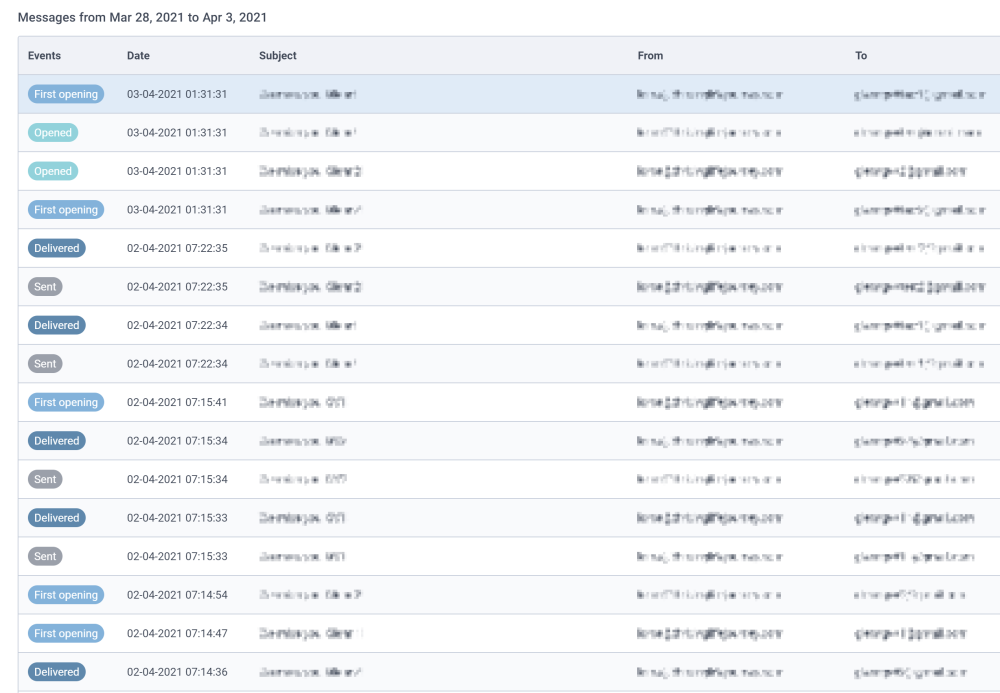
Statistics showing how many email were Sent, Delivered, Opened, Clicked, Bounced and Blocked. List of emails you sent showing the status, date sent, subject, sender and recipient..
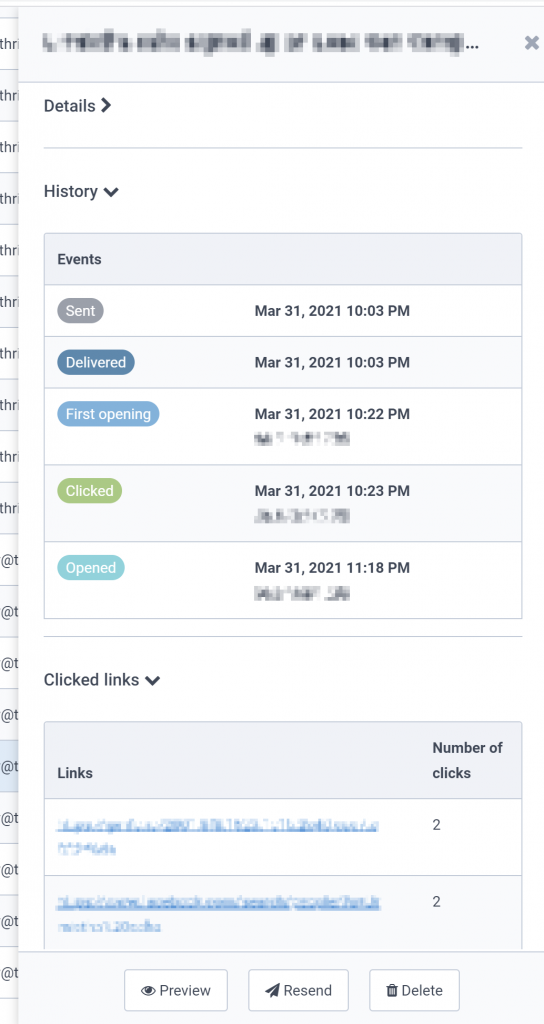
It also shows a list of links in the email that the recipient clicked and how many times clicked. You also have an option to resend the email.
We will create a custom email tool for you that no one else can use but you. Here are the steps you need to do:
Register a Free Account with Us
You need an account in VirtuaBots.com to login to the custom tool we will create for you. This will allow us to restrict access to the tool to just yourself.
- Go to our Registration page.
- Create your free account.
- Confirm your account after receiving email confirmation.
- Make sure you are able to log in successfully.
Create a Free Account with an Email Service Provider (ESP)
You need an account to an ESP that will do the actual delivery of the emails you will send. There are a number of free providers such as SendGrid, Sendinblue, SparkPost, Mailjet, etc. You can sign up for free to anyone of them. Free accounts have daily sending limit and we’ve done the research for you and found out that Sendinblue is the best choice with the highest daily sending limit and with the easiest setup needed especially for non-technical users.
Below are the steps on how to create a free Sendinblue account and how to configure it. If you want to use a different provider, that’s fine. The steps will be different but more or less the process will be similar.
Create a Free Sendinblue Account
The Free plan has no expiration, but there is a daily sending limit of 300 emails. You also don’t need to enter a credit card.
Note: VirtuaBots.com is not affiliated with Sendinblue. Whatever personal information you shared with Sendinblue is outside the control of VirtuaBots.com.
- Go to Sendinblue.com.
- Click “Sign up free” button.
- Fill out the Sign up form:
Company Name
Email Address: You can enter your personal or business email. Preferably your business email.
Password - Click Get Started.
- Check the confirmation email sent to your email address.
- Click the confirmation link in the email.
- Fill out the form to complete your Sendinblue profile.
- Click “Complete my profile” button.
Authorize your Business Email Address as a Sendinblue Sender
Before you can use Sendinblue to send an email to your recipients, you need to authorize your business email address as a Sendinblue (or whatever ESP for that matter) sender.
- Go to Sendinblue Dashboard.
- On the left pane, click Settings.
- On the right pane, click Configure button under “Your Senders & Domains”.
- If there’s already a sender with your business email address and name with Verified status listed there, then you can skip this step and proceed to the next section. But if status is not verified, proceed to step 8 to verify your email as an authorized sender.
- Under Senders tab, click “+ ADD A NEW SENDER” button.
- Fill out the Sender form.
From Name: This is the sender name your contacts will see in their mailbox when you send them an email.
From Email: This is the sender email your contacts will see in their mailbox when you send them an email.. This is your business email address. - Click SAVE button.
- Click “VERIFY THIS SENDER” button in the added sender.
- Click “SEND THE VERIFICATION EMAIL” button in the popup.
- An activation email will be sent to the email address you specified.
- Check your business email for the activation email and click the activation button/link to authorize your business email address to be used as sender in your Sendinblue account.
- Your business email should now show as “Verified” in Sendinblue. This means your business email can now be used to send email via Sendinblue.
- If multiple senders with the same email address are listed, delete all except one. There should be only one sender associated to an email address. You can delete one by clicking Manage > Delete and then clicking Yes to confirm deletion.
Get Sendinblue SMTP Credentials
The Sendinblue (or your ESP of choice) SMTP credentials will be used by your custom Email Tool that we will create for you to send email to your contacts in your behalf.
- Go to Sendinblue Dashboard.
- On the left pane, click Settings.
- On the right pane, click Configure button under “Your Senders & Domains”.
- On the left pane, click “SMTP & API”.
- Click SMTP tab.
- Copy the following. These are NOT your Sendinblue account credentials that you use to login to your account. Do not update the password to be the same as your account password.
SMTP Server
Port
Login
Master password - Save these in a text file. You will need them later.
Create your Own Custom Email Tool
VirtuaBots will create an Email Tool that is custom-tailored for your business. In order for us to do that, you need to do these steps.
- Fill out the Email Tool form to provide us information needed to set up your own Email Tool.
- After you’ve submitted the form, please wait for VirtuaBots Admin to set up your own Email Tool on VirtuaBots.com. The Email Tool is configured and personalized for your business based on the information you’ve provided in the form.
- Once the custom tool is created for you, the VirtuaBots Admin will contact you and provide you the link to your tool. Only you will have access to the tool. You need to be logged in to VirtuaBots.com to access it.
Testing
Once you have your custom tool set up, please test sending email to your personal emails first to make sure everything works as expected before sending to actual recipients. If you want to make changes to the email content being sent to your recipients, please let us know. If you see any issues, please contact us and we will fix the issues.